In this article, We will fix 100% disk Usage on Windows 10 from 11 points of view.

Many people notice that he has purchased a new laptop on Windows 10 and working slow whenever checks system performance it’s showing that 100% Disk usage on Windows 10. Some people notice that after the update their computer is working slowly again found the same scenario that his showing 100% disk Usage.
If you are getting such issue then don’t worry just allow me some minutes and follow all the below step one by one that can be helpful solved the issue.
Before start to fix the we should know about what is root cause of showing 100% Disk Usage on Windows 10. The main root cause after solving the some system problem we found it following’s-
- Windows Update Pending.
- Installing or updating some background apps.
- A bad sector on Hard Drive or SSD.
- Antivirus Issue.
- Driver issue.
- Virtual memory issue etc.
Now’s we are going to discuss all the steps just you should follow that steps-
How to Fix 100% Disk Usage on Windows 10?
Table of Contents
To fix 100% Disk Usage on Windows 10 follow this steps-
1. Restart Computer
if you are getting this issue the first time then you should first restart your computer because maybe some downloading update pending. If after restart your computer same problem is an issue is coming then follow solutions 2.
2. Update Windows Update and security
Many more people notice that he has just purchased a new Laptop but getting 100% disk usage on Windows 10. We have solved the maximum of issues after the update and security on New Laptop.
We know that Windows update and security provide on time to time patches of security and updates. To update and security follow these steps-
- Navigate to Start Menu and click on Settings.
- Click on Windows update and security.
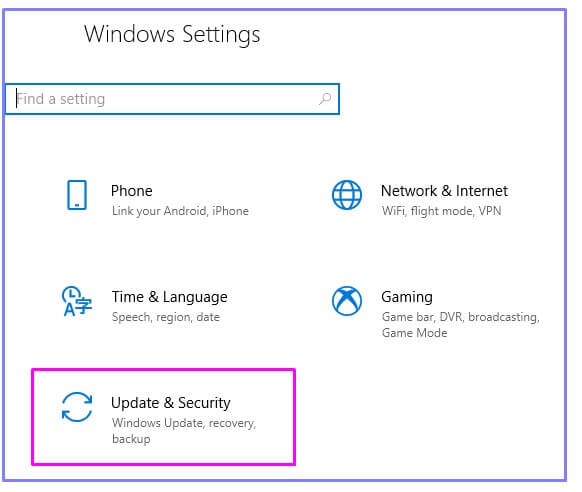
- Click on Check for updates.

- if any update is pending then install that update and follow the process of installation and update.
3. Fix Your StorAHCI.sys Driver
According to Microsoft support, Event ID 129, the resets of the disk controller, can be caused by many factors. Some of the known ones are related to the fact that some Advanced Host Controller Interface PCI-Express models cause these symptoms in Windows 10 when running with the inbox StorAHCI.sys driver.
Due to a firmware bug, the SSD doesn’t properly complete input/output when MSI mode is enabled. As a result, the Windows storage will reset the device after waiting on unresponsive read/write for a period of time.
so you need to disable MSI mode via registry before disable registry you need to verify AHCI Driver (StorAHCI.sys).
- Navigate to run (Windows +R) keys.
- type hdwwiz.cpl and press enter.
- Expand “IDE ATA/ATAPI Controllers” and right-click “Standard SATA AHCI Controller” and select “Properties“.
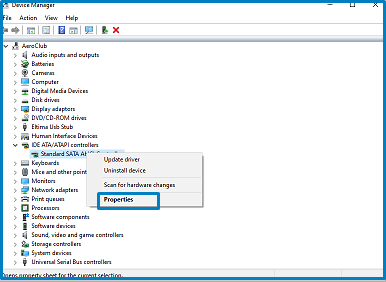
- Navigate to Driver Tab and Click on Driver Details.
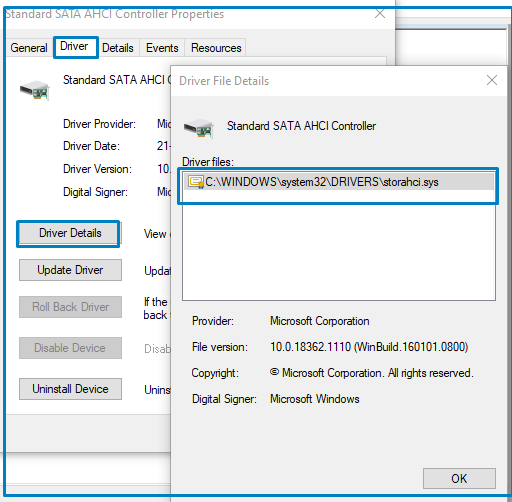
Note:- If you see “storahci.sys” in the list then Disable MSI for the Controller in the Registry
- Navigate to Run and type regedit and press enter.
- Follow the path
- Computer\HKEY_LOCAL_MACHINE\SYSTEM\CurrentControlSet\Enum\PCI\VEN_10EC&DEV_5229&SUBSYS_1854103C&REV_01\4&18138212&0&00E2\Device Parameters\Interrupt Management\MessageSignaledInterruptProperties

- Double click on MSI supported.
- change value from 1 to 0 and Click ok.
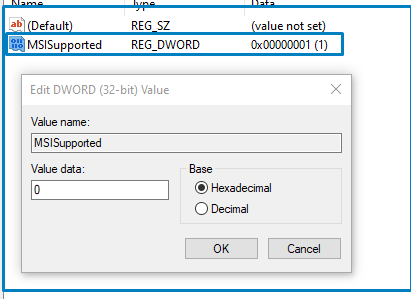
- Disable MSI restart your computer and check.
4. Check Disk Status
Many more options via you can check the status of Hard drive or SSD. CHKDSK is an external dos command used to find the disk info and also solve file linking problem in the disk.
To perform Disk status follow these steps-
- Navigate to Start and search CMD.
- CMD run as administrator.
- type chkdsk/f if any interlinking problem.

if any Hard drive error then change the Hard drive it If the 100% disk usage problem persists, try the next method, below.
5. Reset Virtual Memory
When an application runs on the computer it uses the RAM of the computer. The processing speed of the computer is directly proportional to the RAM present on a computer. This means the RAM of a computer is more the application is executed faster.
Therefore, when multiple applications are executed the RAM of the computer is distributed among all the application. Sometimes, the physical memory of computer is not sufficient to run all the applications simultaneously.
In order to solve the problem Microsoft operating system provides a features called Virtual Memory. Virtual Memory of the computer looks for areas of RAM that have not been used recently and copy them onto Hard Disk of computer.
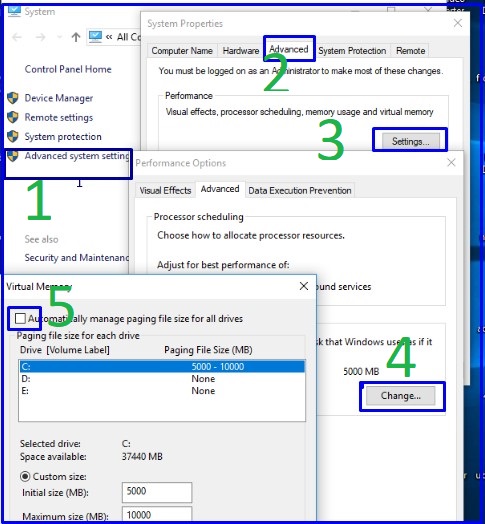
To Reset Virtual Disk on Windows 10 Follow these steps-
- Right, Click on This Computer and select Properties.
- On the Left side, Menu click on Advanced system settings.
- Navigate to Advanced Tab and click on performance settings.
- Click on Change.
- Removed the Check from” Automatic Manage Paging size file from all drive.”
Note:- Initial size: this value can vary depending on your computer. If you’re not sure what value to enter, just enter the recommended number.
Maximum size: it is recommended to set this value 1.5 times the size of your physical RAM. If your PC has 4GB (4096 MB) RAM, the value should be no more than about 6,144 MB (4096 MB x 1.5).
6. Temporary Disable Windows Search
Windows search is one of the best tools where you can find search from anything from any drive or location. We are suggesting you do not permanently disable Windows search but sometimes being you can disable and cross-verified your issue “100% Disk Usage on Windows 10”.
- Navigate to Run (Windows+R) keys.
- type services.msc and press enter.
- scroll down, Right Click on Windows search, and click on stop.
7. Disable Antivirus Program
Many people notice that in the background his Antivirus program is updating or creating bugs on computers. For sometime you can temporarily disable Antivirus and check the Status of Hard Drive 100% Disk Usage on Windows 10.
Some Other Fixes to Fix 100% Disk Usage on Windows 10 for more details click on the link
- Disable Startup Program
- Use Disk Clean-up Utility
- Defragment and Optimize the Drive
- Enable Automatic Maintenance Settings
- SCAN Your Computer Drive
- Disable Backgrounds Apps
So, This is all about the “100% Disk Usage on Windows 10“.
We hope that you like this Article and helpful for “100% Disk Usage on Windows 10“. You can also Join Us from Social Media Pages Like Facebook and Twitter.
Thanks For Reading, Have a Nice day.
Nice