Hey! If you want to fix “startup couldn’t repair your PC” in Windows 11, Windows 10, or Windows 8, follow this article.
If you are getting an error message “Startup couldn’t repair your PC” in Windows OS, it indicates that the automatic repair could not be processed, preventing your computer from booting correctly.
Root Cause of “startup couldn’t repair your PC”-
Table of Contents
As per the user’s experience, some of the top Startup couldn’t repair your errors the following-
- It might be a Corrupted System File with possible causes such as – Damaged or missing system files,
- etc.
- It might be a Hardware Malfunction with possible causes such as -Faulty hardware like a hard drive, RAM, or motherboard, etc.
- It might be an Incorrect Boot Configuration issue with possible causes of boot order or configuration.
- It might be a Malware Infection Issue with possible causes such as – Malicious software.
How startup couldn’t repair your PC in Windows 11/10?
To fix the startup couldn’t repair your PC follow the below process to fix the issue-
1. Restart Your PC
This is the first process Sometimes, a simple restart can resolve temporary issues. Once you restart your computer might be a temporary issue due to an incomplete update. If the issue persists, continue to the Next Step-
2. Boot Computer In Safe Mode
To boot your computer in safe mode follow these easy steps-
STEP#1. Power on your Computer, then hold the power switch for about 5-6 seconds. You need to do it twice after you see the preparing automatic repairing screen.
STEP#2. Next Screen (Windows to diagnose your PC).
STEP#3. Click Advanced options (Startup Repair Screen). Click on Startup Settings.
STEP#4. To Power on your computer in Safe mode with Networking you press 5 or hold down F5.
3. Use SFC Command to Repair Corrupted files and Windows Missing files
To run the SFC command in Windows 11, Windows 10, Windows 8, and Windows 7 follow the below steps- (Do this process in Safe Mode)-
STEP#1. Navigate to Run and Search CMD.
STEP#2. Run CMD as administrator.
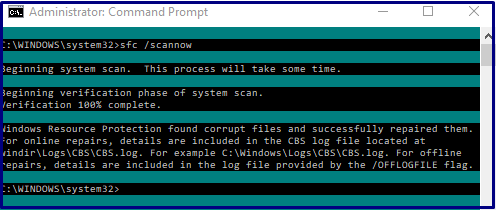
STEP#3. Type SFC /SCANNOW and hit Enter.

STEP#4. Wait for the scan to complete. If any corrupt system files are found, SFC will attempt to repair them automatically. Once the scan is finished, restart your computer. If the issue persists, continue to the Next Step-
4. Use System Restore Point
For Windows Restore Point you follow the following steps- ( DO in Safe Mode)
STEP#1. Right-click on Computer and select Properties.
STEP#2. Click on Advanced System Settings on the Left panel.
STEP#3. Navigate to the System Protection Tab and click on System Restore.
STEP#4. Click on Next( Restore system files and settings).
STEP#5. Select Restore Points and click on Next.
STEP#6. First Close the programs and and click on Finish. If the issue persists, continue to the Next Step-
5. Use Windows Installation Media to Repair Windows
To Use Windows Installation Media to Repair Windows follow the below links
Click Here to Know - How to Repair Windows
Conclusion :
Hopefully from the above steps your issue “startup couldn’t repair your pc” has been resolved. Apart from this, you can also Check Hardware such as RAM, HDD, and SDD.
If you want your computer will work smoothly then follow tips such as Regularly updating Windows, Regularly creating system restore points, and Backing up your important data to an external hard drive.