“Windows Resource Protection could not start the repair service” issue was found when trying to run SFC/SCANNOW in the Microsoft Operating system. There are 3 ways to solve it.

What is SFC (Scan File Checker) Utility? Why do we use SFC Utility?
y is one of the best utilities for repairing Corrupted files and Windows Missing files such as. DLL missing file.
SFC file checker has first introduced on Windows 98 Operating System for preventing a malicious attack, Corruptions, or repairing the such as. DLL missing file. We use the SFC file for prevented external attach, System File Repaired, and file corruption.
How to Run SFC Utility?
- Navigate to Start Menu, and type CMD.
- Right, Click on CMD and Run As Administrator.
- Type sfc /scannow (For repair Windows File, Corrected File).
- if you want to only View then type – sfc /verifyonly for no repair.
if you run sfc /scannow and get the message ” Windows Resource Protection did not find any integrity violations” it means your sfc/scannow (SFC) utility has been successfully executed.
Sometimes when trying to run sfc /scannow utility and get an error such as “windows resource protection could not start the repair service” then it means that some problems in SFC utility.

if you are getting any errors when trying to run the SFC utility. Do not worry because we have 3 tips that help to solve this issue.
How to Fix Windows Resource Protection could not start the repair service?
Table of Contents
For fixing windows resource protection could not start the repair service you follow below the following method-
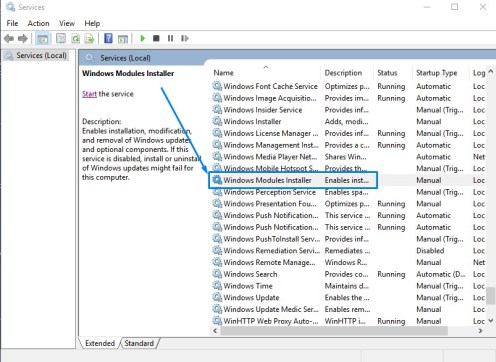
Enable Windows Module Installer Services
Windows Module installer Services is one of the services of the Windows Operating system that allow the user to used such as Enables installation, modification, and removal of Windows updates and optional components. If this service is disabled, then you can not do install or uninstall Windows updates might fail for this computer.
How to enable Windows Module installer Services using Command Prompt?
Method -I
- Navigate to Start Menu and search CMD.
- Right, Click on CMD and select Run as Administrator.

3. If prompted for administrator granted click on Yes or if asked for a username password then type and Enter.
4. Type “sc config trustedinstaller start= auto” command and hit Enter. Now you should receive a message that Modules installer service is starting.

5. type net start trustedinstaller and press Enter. Then after you should receive a confirmation message that “The Windows Modules installer service is starting.

6. Once you restart your computer Try to run the SFC utility.
How to enable Windows Module installer Services using Services.msc?
To solve issue ”windows resource protection could not start the repair service” and enable Windows Module Installer Services Follow Following steps-
- Press Windows +R Key (Run) and type services.msc.
- Press Enter.

3. Scroll Down and Double Click on Windows Module Installer.

4. Navigate to General Tab, select startup type Manual and Click on Start.

5. once you restart your computer and Try to run SFC utility.
Boot System Into Safe Mode
Once you try to boot your computer in safe mode for solving the issue “windows resource protection could not start the repair service”
Safe mode is one of the best tools for a computer operating system. In Windows, the safe mode allows users to essential system programs, application software, and services to start up at boot. The main intended for booting in a safe mode such as data backup removed malicious software and programs. The purpose of Safe Mode is to allow, the user to troubleshoot Windows and try to solve the problem and do it correctly. Once you have corrected the problem, then you can reboot and Windows will start normally.
In Microsoft environment is accessing by press F8 key as operating system boots and multiple operating system environments, First select operating system then after press F8. In Windows 10 press Ctrl+F8 key for safe mode. Safe mode starts basic mode and accessing of some limited set of programs and drivers.
If you want to know in details about safe mode Click here
3. Use DISM (Deployment Image Servicing and Management)
DISM is a useful utility for solved windows resource protection could not start the repair service issue for same you follow the following steps-
- Navigate to Start Menu and search CMD.
- Right, Click on CMD and select Run as Administrator.
- Type DISM /Online /Cleanup-Image /RestoreHealth and hit Enter.
- Once Completed then Restart the Computer and check.

Conclusion:
Hopefully from the above steps, your issue “windows resource protection could not start the repair service” has been resolved. If you have any doubts or queries please comment to us.

Great blog here! Also your site loads up very fast!What host are you using? Can I get your affiliate link to your host?I wish my website loaded up as fast as yours lol