In this blog, We will discuss about how to create and configure DNS zones.

What is DNS Zones?
Domain Name System (DNS) zone is a logical partitions DNS database via DNS can easily access and managed which administrative responsibility has been delegated to a single control.
In the DNS zone, data divided into a manageable set of data DNS zones. All DNS zone are organized in a hierarchical tree-like order of cascading lower-level domains, form the DNS namespace.
In other words, DNS data divided into manageable sets of data in a logical partition called the DNS zone. DNS Zone is a file of DNS that divided into multiple parts of delegation control.
The authority over each DNS zone is delegated to a legal entity or organization such as a country-code top-level domain registry or a company or individual registered to use a certain sub-domain within the system.
DNS zones may consist of only one domain, or of many domains and subdomains Depending on the administrative rights delegated to a certain entity.
If you want to know about DNS zones Click Here
What is DNS Server: Domain Name System
In here, We can configure DNS
Create and Configure Primary Zone Using DNS Manager
Table of Contents
- Open Server Manager Dashboard and Click on Tool from Right Panel and Select DNS.

2. Select Lookup Zones, If you want to configure in forward Lookup Zones select Forward either Reverse Lookup Zones.
Right Click on Zones and Click on New Zone.

3. Read Welcome screen about zone translate DNS names to related data-
Click on Next.

4. Select Primary Zone
and click on Next.

5. If you want to create Zone for entire forest you select ” To all DNS server”.
If you want to create Zone for Domain Controller on this Domain then Select ” To all DNS server running on the domain controller on this Domain”
na Click on Next.

6. Enter Zone Name and click on Next.

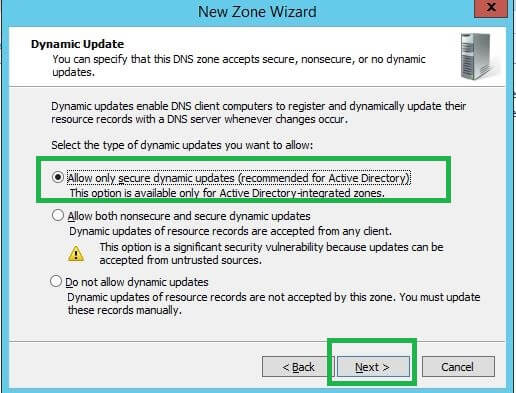
7. Dynamic Update is a feature of enabling DNS Client computer to register and dynamically update their resource records whenever changed and update on Primary Zone.
Idf you want to Update and update records automatically select “Allow Only Secure Update”.
Click on Next.
8. Now a received a conformation meassage for configrations of Zones.
Click on Finish.

Configure DNS zones type Secondary
For configure DNS zones type secondary you follow the following steps using DNS Manager-
9. Again you Follow step (1-3)
select Secondary Zone (If You want to Know about Secondary Click Here).
Click on Next.

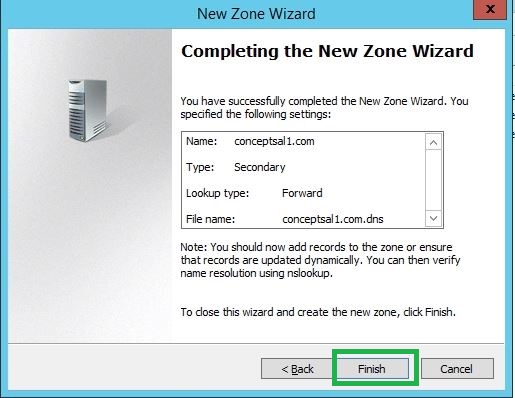
10. You have already know before previous blogs that Secondary zone is read copy of Primary Zone-
Select the DNS server that you want to copy the Zone and Click on
Next.

11. Now review your configure dns zones and click on Finish.
Create and Configure Stub Zone Using DNS Manager
12. Again You follow above steps from 1-3.

13. Select Active Directory Zone Replication scope and click on Next.
14. Typ here your Authorized namespace Domain name that you want to allow and Click on Next.
15. Specify the server name that you want to load for stub zone for querying the zone master server for SOA resource record and a glue a resource record.
Click on Next.

16. Review Your Configurations and Click on Finish.
How to Configure DNS zones using Powershell-
For Configure Primary DNS zone using Powershell, you follow following commands-
(Primary Zone)
Forward Lookup Zone
Add-DnsServerPrimaryZone -Name ZONE_NAME -ReplicationScope SCOPE -DynamicUpdate UPDATE_TYPE
Reverse Lookup Zone-
Add-DnsServerPrimaryZone -NetworkID NETWORK_ADDRESS -ReplicationScope SCOPE -DynamicUpdate UPDATE_TYPE
For configure, Secondary Zone Using PowerShell used Following Commands-
Add-DnsServerSecondaryZone -Name “ZONE_NAME” —ZoneFile “ZONE_FILENAME” -MasterServers “MASTER_IP”
For configure Stub Zone Using PowerShell used Following Commands-
Add-DnsServerStubZone -Name ZONE_NAME -MasterServers MASTER_IP -ReplicationScope SCOPE
Now your Concept has been cleared about Configure DNS zones. If you have any doubts and query please comments me.
Thanks For Reading, Have A Nice Day
Nice sir
GOOD SIR
Great knowledge
Bahut badhiya
Good learning experience
You should take part in a contest for one of the best blogs online.I’m going to recommend this web site!